Today I'm sharing a dessert perfect for the end of the summer season and start of fall. S'more desserts seem to be all the rage today and I'm sure your pintrest feed is full of them, but you won't mind just one more right? A few weeks ago I received this cut and seal little gadget from pampered chef (thanks mom!). It cuts and presses food into these little pocket sandwiches, just like the Smuckers uncrustables. We use it all the time to make homemade uncrustables, which my kids love. Today I finally got the time to try it out in a different way, I think this could be one of my new favorite tools! Also they are super affordable at only $10.00. It is so easy to create little single serving desserts perfect for the little kids and the big ones. I can't wait to try some other flavors now!
And maybe just maybe I'll be giving on of these away soon So if your not a Facebook follower yet you may want to stop by our page and say hello. :)
Here's what you going to need:
1 package pie crust
1 jumbo Hershey's candy bar or regular small bars
1 7oz jar of marshmallow cream (I had a large one on hand)
warm water
Sandwich cutter/circle cutter
Parchment paper
Rolling pin
Makes 10 mini pies.
Preheat oven to 400.
Step 1: Line baking sheet with parchment paper.
Step 2: Break up Hershey bar into tiny little pieces. If your wondering why you can't just stick them on there in the pre made pieces..it's because they don't melt well.
Step 3: Open both rolls of pie crust and lay flat on clean surface.
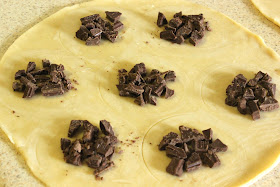
Step 4: On one piece of pie crust use cutter to gently mark circles into the dough. This will give you a little guide to help keep the filling in place. Don't push all the way down you just want a very light mark. I was able to get 7 out on the first round.
 Step 5: Spoon about 1 TBS of Hershey chunks into the center of the circles. Keeping the chocolate on bottom and the marshmallow on top allows the chocolate to melt and the marshmallow to rise into a nice shape.
Step 6: Spoon about 1 1/2 TBS of marshmallow fluff onto of the chocolate.
Step 7: Use a clean finger to trace some warm water around where the lines are in the dough. This will help the two doughs stick.
Step 8: Gently lay the second pie crust over the first. Now gently press around the little mounds and smooth out the dough.
Step 9: Line up your cutter above the center mound and cut. If your using a cut and seal like mine I found the trick was to push down on the outside first to cut then press straight down on the spring to crimp. Pull up and push the spring again to release. Then lay on parchment paper. If your not using a cut and seal simply cut the circles first, remove excess dough, then crimp the edges all the way around using you finger tip or by making marks with a butter knife.
You can then ball up your excess dough and roll it out again to make several more.
Step 10: Line up on a parchment sheet and bake
at 400 for 12-14 minutes. I'm a burnaphob so I like mine on the soft golden side :)
Now just give them a few minutes to cool off a bit and enjoy. Yum-O. These are really great for the kiddos. I think even my toddlers could handle these without needing a bath....maybe. And surprisingly they were pretty good cool too and easy to rewarm back up!
Happy Baking!


