
I am so excited to share Miley and Bailey's Monkey party! I can't belive it's already been a year since they were born.
 This will be post 1 of 2. I will post the pictures with the girls in 2. Here's the party details!!!
 When planning their party it had to start with monkeys! Anybody that knows me and my family knows that we call the girls monkeys, instead of twins. I decided to use two shades of pink to represent the two girls..then came the yellow and polka dots
I started off by purchasing some monkey graphics from Maree TrueLove. Check her etsy shop out she's amazing. I then started making all the paper party elements; food lables, water bottle lables, banner, ect. I like to make everything I can, it's fun and way cheaper! I also had to keep in mind I was having the party 700 miles from home so I had to keep it simple but, I couldn't skip out on my baby girls first birthday! It was hard to plan knowing I couldn't transport too much and I wouldn't have time to assemble to much once there which created a problem with just about everything! Here we go...
Here's the invite I made...I wrapped it in pink tulle with a yellow polka dot ribbon and sent out in bright yellow envelopes :). Decorations: we set up everything on long tables in the front. I should add we had the party at a local church, which we have family whom attend. BIG THANKS! They were overly nice and so accomadating. When you in the military and far away from family it's awesome to have a place for all your family to gather and celebrate things like this :)
  Cake smash station. One of my FAV things..check out the balloon weights. Bananas were a great easy touch to the party, what better balloon weights. I covered two borrowed high chairs in a yard of fabric then wrapped tulle, then used the girls tutus from their pictures to spruce up their highchair. I love to re-use anything I can. How's that for partying on a budget!
  The hats (and clothes) were embroidered by the girls Grandma, then I assembled and added all the little frills.
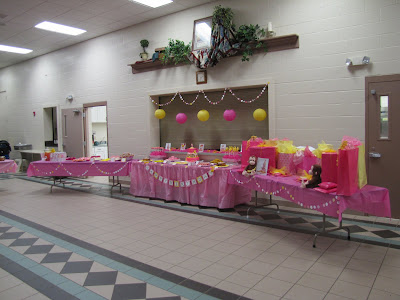
 Here's the dessert table..I had lots of fun planning this out! The paper garland stung on top was made from scrap paper. I will soon share how I made it. Once again cute, and free! I placed the girls birthday pictures along the bar and made the banner that went in front.


 The kids table.
  The kids lunchboxes... I got this idea from another site..and I can't remember where??
 The kids also has drinks, chex mix, a monkey plate to keep, and crayons to color on the place mat. Having a kids table set up makes things so easy for the parents..they can sit down and eat and be entertained while the grow ups can grab some goodies for themselves.
  Banana centerpieces..

 I marked each side with pictures, to people could tell where to put gifts. This is something I will continue, everybody seemed to love it and it made gift opening easier. This table was packed byt the end, the girls were very spoiled!

 Party Favors!!!!
Decorations: we set up everything on long tables in the front. I should add we had the party at a local church, which we have family whom attend. BIG THANKS! They were overly nice and so accomadating. When you in the military and far away from family it's awesome to have a place for all your family to gather and celebrate things like this :) Cake smash station. One of my FAV things..check out the balloon weights. Bananas were a great easy touch to the party, what better balloon weights. I covered two borrowed high chairs in a yard of fabric then wrapped tulle, then used the girls tutus from their pictures to spruce up their highchair. I love to re-use anything I can. How's that for partying on a budget! The hats (and clothes) were embroidered by the girls Grandma, then I assembled and added all the little frills. Here's the dessert table..I had lots of fun planning this out! The paper garland stung on top was made from scrap paper. I will soon share how I made it. Once again cute, and free! I placed the girls birthday pictures along the bar and made the banner that went in front. The kids table. The kids lunchboxes... I got this idea from another site..and I can't remember where?? The kids also has drinks, chex mix, a monkey plate to keep, and crayons to color on the place mat. Having a kids table set up makes things so easy for the parents..they can sit down and eat and be entertained while the grow ups can grab some goodies for themselves. Banana centerpieces.. I marked each side with pictures, to people could tell where to put gifts. This is something I will continue, everybody seemed to love it and it made gift opening easier. This table was packed byt the end, the girls were very spoiled!Party Favors!!!!Each "baby" went home with a small stuffed monkey and a monkey snack contanier filled with banana cookies. I made homemade pink/yellow play dough and stuck it in monkey containers which I found 2 for $1.00 at the dollar store! Then I made little notebooks with scrap paper, and gave each kid a yellow pencil, banana eraser, and small barrel of monkeys.
I made homemade pink/yellow play dough and stuck it in monkey containers which I found 2 for $1.00 at the dollar store! Then I made little notebooks with scrap paper, and gave each kid a yellow pencil, banana eraser, and small barrel of monkeys. Each family went home with a loaf of banana bread. To make these "cute" I wrapped them in pink tulle, added a banana runt, and finished with a tag I made.
 Cakes!! Doing three cakes was a task..especially in a different location with a fraction of my tools and a house full of family! It wasn't what I had planned but in the end it came out pretty good. So glad I was able to make my baby girls their bday cake! I made each of the girls a small smash cake in light and bright pink. I am so mad I didn't get a picture of the inside! The top was banana, the middle strawberry, and the bottom chocolate! I love making the cake match the party perfect and tast just as good :)


 Food!! I tried not to go to complicated with the food since the party was 700 miles away from my kitchen :) The one thing I decided to order was the cookies. I was SO not dissapointed. Check out her store on etsy, The Cookie Jar. I sent her an image and she replicated it to the T. I was blown away by the detail!




Cakes!! Doing three cakes was a task..especially in a different location with a fraction of my tools and a house full of family! It wasn't what I had planned but in the end it came out pretty good. So glad I was able to make my baby girls their bday cake! I made each of the girls a small smash cake in light and bright pink. I am so mad I didn't get a picture of the inside! The top was banana, the middle strawberry, and the bottom chocolate! I love making the cake match the party perfect and tast just as good :)Food!! I tried not to go to complicated with the food since the party was 700 miles away from my kitchen :) The one thing I decided to order was the cookies. I was SO not dissapointed. Check out her store on etsy, The Cookie Jar. I sent her an image and she replicated it to the T. I was blown away by the detail! 

These were so much fun to make! Chocolate covered oreos!
 Banana pops, I only had one mold...so these were a little time consuming, but the kids loved them!

 Banana pops, I only had one mold...so these were a little time consuming, but the kids loved them!
Monkey monuchies! Chex mix with yellow and pink m&m's added to make it match of course! It's all about the detail!

 and here's a little sneek peek of some cake smashing :)
 and here's a little sneek peek of some cake smashing :)
Whew!!! That was a long post! I hope this inspires some ideas for you! Pictures of the girls to follow.....

 I wanted to share this cute little project I did today. I have been trying to find cute curtains for Cadence's room for a while now. The second I hung up some cute little pink curtains today I hated them! Her room has amazing lighting that we both love and I only wanted something for decor, as there are already blinds. She said mommy I wanna see all the cars! lol. So I needed something cute that didn't really block the light....and I came up with this cute little idea! I love it! And a major plus is it was FREE! Came straight out of my craft closet :) This is a super simple project! Just cut the ribbons any length you want and tie! What I love about this is you can do lots of different things....tie the knots ar random, use different ribbon widths, and how cute would it be as a full curtain!? I used 7/8th ribbon that matched her bedset.

 Ever need a birthday (or just because) present for a kid that you have no clue what to buy for? Or possibly the kid has everything? I've been there several times, and I came up with the solution of little themed gift baskets when I'm not sure what to get somebody. They are fun for me to create and result in a bunch of little fun items instead of one something I have no idea if they will like.
 Strawberry shortcake lunchbox: strawberry bubbles, stickers, socks, strawberry moarshmellows, strawberry pocky sticks, strawberry shortcake make your own candy necklace kit, and several lipglosses.
 Sports box: baseball bubbles, soft football, football washcloth, gummy sports candy, chocolate sports balls (for a 1 year old).
 Hello Kitty lunch box: Hello Kitty Pez, Hello Kitty band aids, Hello kitty snack sticks, Hello Kitty nail polish, Hellow kitty chapstick, Hello Kitty stickers, and Hello kitty Jelly beans.

 Thoughts for the mommy as she enters the jungle!
 We played two games, baby animal names and a baby brand game
 The "watering hole"..
 baby animal cracker favors...
 Cupcakes I made along with the little animal toppers...


 All the goodies!!!
 The banner we made, which doubles as a great nursery decor...
 The beautiful mommy-to-be!
 Her animal quilt made by, Cindy Miller...isn't she so talented!?!
 Our gift to Kellie, a whale bath tub filled with animal items!
 We made this to hang in his room :)
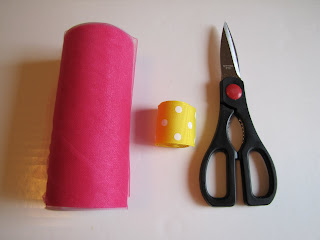


 Step 6: Slide knots along ribbon to center and create the desired look. The more you sqeeze in the fuller the tutu will be. Make sure you have an equal amount of ribbon on the ends. Then tighten each know by pulling just underneath it.
  Fold and cut the ribbon ends to create a V end. If you would like to heat seal the ribbon ends so they dont fray. Quickly run a lighter close to the ribbon along the cut edges. The heat from the flam will melt the ribbon to keep it from fraying. (DO NOT touch flame directly to the ribbon)


 Here's Miley modeling hers! Notice the tip toes...she's a natural ballerina!
  Tada!! Tutu cute!!
 mommy's barefoot babies in their "I love Daddy"and "I love Mommy" shirts...having two sometimes does come in handy :)
 Of course Grandma Miller and Aunt Amber had to send them Valentines! This picture does no justice..their boxes are always filled with adorable things. This one included Handmade cards, shirts...and cute red and white candies and tiny animal crackers....so cute! The kids were thrilled.
 I had orginally planned on giving the cookies I made to Cadence's ballet class....2 hours before class walking through the store I realize I totally forgot about them and they were still frozen at home! I ended up picking up some lip/heart cookies and girly little tins with candy in them for all the littler ballerinas. Being the crazy that I am I couldn't just take something super simple like heart fruit snacks! (thumps head on wall) so here I am driving down the road stuffing treats into bags. Hint's the carseat photo..had to share though...it was a super mom moment for sure!


