
The party was for my niece who was turning 3. I should add that Gracie is a miracle baby born at 1.8oz, carried for 3.5 weeks after the water broke. Birthdays for her are a huge celebration of life! I was excited to help my sister throw it together. I made some of the printables a few weeks ahead of time and took them to Indiana. All we had to buy was food for the party and a table cloths, cups and plates. An easy but cute party to pull off!? Great for a budget. The pictures are not the greatest :( the lighting was not great.
 Here's some of the goodies set out. My sister also ordered pizza for the guest too eat.
 The tower of cupcakes.
 Here are my sisters three kids in their seasame street shirts.
 For the treat bags my sister colored some chocolate chips on the bags. We had different chocolate chip theamed items inside as well as coloring items.
 One of my favorite things! We wrapped the silverware in blue ribbon and used icing to glue cookie crisp to them :)
 We stuck googly eyes on everything making them cookie monster.
 Almond joy pieces!
 Here is the cake I made. One of the simplest but cutest cakes I've made! I covered the cake in fondant and then stuck hershy kisses in it.
 Another shot of the dessert table. See the crepe paper??? My sister took time to draw brown circles on them making it chocolate chip!
 We added eyes to the punch also! The blue paper shred was everywhere it reminded me of cookie monsters fur.
 We picked up these cookie jars at either Target or Walmart. They added a great touch to the party! Also the plastic tongs came from the dollar tree. I have had them forever they always come in handy at parties!
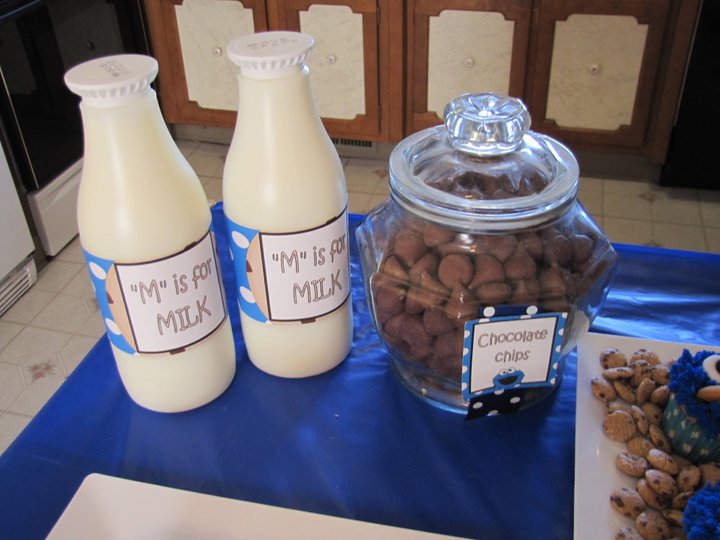 We had to have milk! I made the lable to go with the seasame street theme. And then we sat out a jar of unwrapped hershy kisses as "chocolate kisses". That was one of those DUH ideas that came out great!
 A local bakery has made these sesame street cookies for years. My mom remebered them and sure enough they had them still! We added some cookie crisp and wrapped them up in favors. These were a great find.
 Here's the banner I made..not a very good pic though :/
 Here's gracie stealing some milk and cookies before the party!
 And Gracie with her big sister! We couldn't find a big bird shirt so the night before the party I drew him on her yellow T-Shirt. She was happy.
 My favorite shot of the birthday girl!
And there is the cookie monster party!!! Hope that gives some inspiration to those throwing a cookie monster party!
 In the last post I shared about our kid's play kitchen and that I would be making some new things to go with it. Here's is one of the things I wanted to make! Iced cookies! You know those super soft yummy iced cookies that they always have out at Wal-mart and Krogers ect.? Those are a store bought family favorite around here so I decided to make some play ones for the twins. We actually have lots of play foods. I have a strict no plastic food poilicy around here :). They always ended up squished or crack and I just don't like them. After buying all the target wooden food we started on Mellissa and Doug. But they are so pricey. When Cadence was little her Aunt Amber started making her all kinds of felt food. She does an awesome job. So although we have tons we always welcome more. The kids love it! I will share them all eventually. But every once in a while I will make some because they are so much fun. So here's how to make some.
 You will need a sugar cookie color felt and whatever icing colors your would like. I chose pink and white. Pins, thread, beads, scissors, a cup, stuffing, and a very thin needle. You will also need a second cup or slightly smaller circle. I used my sewing machine but it's optional.
 Want to share about my beads. I found these at Micheals awhile back. They were $10.00 then I used a 40% coupon..but they've been a great spend because everytime I need little bead I pull this out. Love it!
 Step 1: Take the cup and trace around the sugar cookie colored felt. 2 times as many cookies you want to make.
 Step 2: Use another cup or circle slightly smaller then the first and trace them onto the icing color. I used a kid cup that was a bit smaller. Sorry I forgot to take a picture.
 Step 3: Cut out the circles. I cut them all inside the black line I made with the marker.
 Step 6: Sew on the beads. I sew them in a spiral from the outside in. I use a very thin needle so the eye will pass through the tiny beads or "sprinkles". If you are worried about the little ones with the "sprinkles" you can make stiches of embroidery thread to make them.
 Step 7: Pin together the cookies right sides together if your using a machine. If your hand stitching them leave them right sides out. Sew around the cookie all about 3/4ths of the way.
 Step 8: Turn the cookie inside out. Starting to look like cookies!
 Step 9: Stuff the cookies with filling.
 And here they are! They are not perfect but my little ones won't mind. While I am at it I thought I would share a few more of some felt desserts my kids have.
 One of my favorite sets! Gingerbread cookies by Grandma Miller. This has the "rolled out" ginger bread and the kids can cut out the ginger bread cookies and then there are the finished ones. She even included a pan, a rolling pin, and the cookie cutter!
 Valentine's cookies made by Aunt Amber.


 I had planned on putting their names on the hoods, but then I decided not to at the last minute. Daddy thought it would still be best to have them personalized so I added their initial at the bottom.


