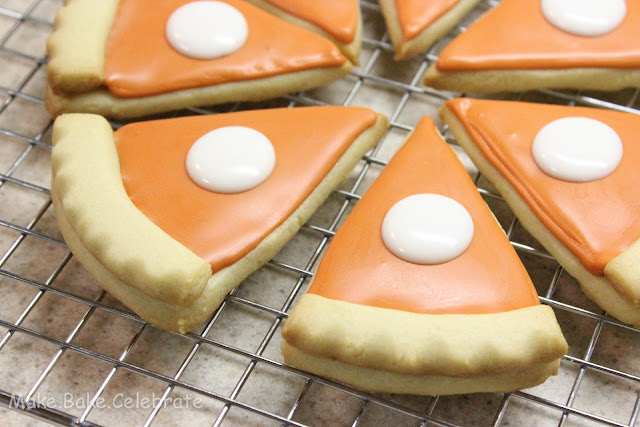
As we all know, pie is the traditional dessert for Thanksgiving. Which creates a slight problem for me (the dessert maker) each year because I really don't make pies, like ever. As you probably already know my "thing" is desserts that are equally as cute and festive as they are yummy. You know...sprinkles, fun colors, treats on sticks, dipped in chocolate....it's just as much about decorating as it is taste, kind of an art. So we only really make pies for Thanksgiving and even then it's not all that exciting for me. But I have found ways of mixing up traditional "pies" to fit my festive food habits...like making pocket pies, pies on a stick, pumpkin pie mousse, or even pie cupcakes...and now pumpkin pie cookies!
I really wanted to make a pumpkin pie cookie this year. The thought came to me a few months ago and I couldn't wait to try it out. Even though I love decorating cookies my cookie decorating skills are minimum so I love to make easy simple designs like this! (this is another great beginner cookie) So I set out to make a fun sugar cookie that looks like a pie, and I can honestly say, I loved making this pie!
I shared them with the kids this weekend and they were completely confused lol, but that didn't stop them for eating every crumb. Speaking of crumbs...these cookies are so great for the kiddos at Thanksgiving because other the a few possible crumbs they are pretty mess free and I honestly think my kids would chose these over an actual piece of pie any day :) Win, win. For these yummy cookies I used my FAV rolled sugar cookie by Gloria at Glorious Treats, but of course you can use any rolled sugar cookie you would like.
OK here's what your going to need:
4 cups powdered sugar
4 TBS meringue powder
6 TBS warm water (+some for thinning)
Copper gel food coloring (Wilton)
Brown gel food coloring
Things you will need:
Pizza cutter
Rolling Pin
Pie size bowl
Knife
2 icing bottles
2 doll rods (I used 1/4in)
Parchment paper
Toothpicks
I was able to make and ice 3 8in "pies" with 8 pieces in each.
Step 1: Preheat oven according to sugar cookie recipe used. Mine was 350 degrees. Then place ball of cookie dough on a large sheet of parchment paper with a doll rod on each side. These will keep the dough even as you roll it out. I only used half of my dough at a time.
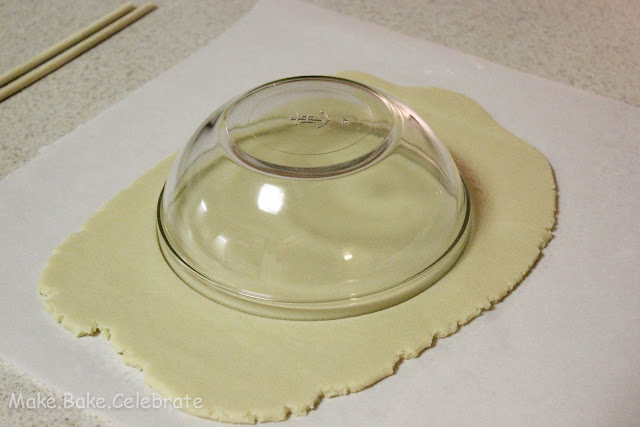
Step 2: Roll out the dough, it will need to be big enough to account for you bowl.
Step 3: Press your bowl into your dough to make your pie shape. I used a glass 8 in Pyrex bowl. After your pressed the bowl down firmly take your knife and your pizza cutter and go around the bowl to cut off the excess dough.
Step 4: Once the excess dough is removed you can pull the bowl off. In order to get it off easy I took the tip of my knife and slide it under the bowl rim a but then gently lifted up. The bowl came right off.
Step 5: Now slice your pie. I first cut the "pie" in fourths with my pizza cutter then I sliced those in halves with a knife so the pizza cutter wouldn't crush the tips.
Step 6: Now gently move the slices to a parchment paper lines baking sheet.
Step 7: Roll excess dough out again and cut into strips for your pie crust. mine were about 1/2 inch wide.
Step 8: To make the pie crusts gently lay the strips of dough over each "pie" piece and cut to fit. Then gently moved them above each "pie" piece. Then use the end of your dowel rod to press little indents into your crust.
Just a little note: I tried this many different ways and this was the way I liked best. Baking the crust with the bigger cookie allowed the crust to keep shape better and brown a bit. Normally I'm a total burn-a-phob and pull cookies out right before they turn golden. But these look a lot more like pie when they are golden :)
Step 9: Baking time will depend on the recipe you have used, so keep an eye on them and as soon as they start to golden pull them out. Mine were good after 8 minutes. Let cool on a cooling rack.
Now time to make the royal icing...If you need more info on royal icing, I talk more about it here and have several VERY helpful link to awesome cookie bloggers :).
Step 9: Mix together 4 cups of powdered sugar and 4 TBS meringue powder. Then add 4 TBS warm water. Mix well. Set aside about 3/4 cup in an airtight bowl for your "whipped topping".
Step 10: After you've set aside about 3/4 cup of white...begin to add copper coloring to your royal icing. Mine took a lot of copper and a few drops of brown until I decided it was about right.
Step 11: Now add very small drops of warm water until you have a good 20 second icing.
(check out this post for 20 second icing info) Once your pumpkin pie color is all ready to go. Go ahead and thin out your white as well, to a 20 second icing. Once each has reached a 2-second icing pour into decorating bottles. Remember to keep all icing sealed when not using!
Step 12: First glue on pie crust by placing a small line of icing on the cookie and then laying it on it.

Step 13: Outline the cookie.
Step 14: Then flood the cookie. Be careful not to put too much on...you can try to cover it best as possibly then use a tooth pick to spread it around.


Let dry for about a half hour. I made three "pies" total. I found that about by the time I was done icing the last piece the first by was firm enough to top. You will notice the icing becomes more dull and looses its shine as it begins to crust over.
Step 15: Once your icing has begun to crust over, apply a large dot of white icing. I simply held it in the middle and squeezed out a dot then swirled the bottle tip around inside the dot to spread it out a bit. (make sense?)
Once your first layer has crusted over a bit you can add a second smaller dot, then a third final dot. Let sit for about 8 hours to dry before stacking. I generally make these in the evening and allow to dry overnight.
....and now your have some super cute "pie" for Thanksgiving. Not only would these be great at the kiddo table...they were be fun to take to teachers to say happy turkey day! Unless your into baking lots of pies and handing them out ;).
I'll be back tomorrow with some "dinner" to go with this pie :)
Happy Baking!


